This article explains the procedure for version 3.0
This is the first article to give you some inspiration and tips to think outside the box. At this point, I assume you already know the basics and have set up your first generated map(s). It’s okay when you haven’t touched the Templates in the Plugin Manager yet; I will guide you through them.
So, what are we going to build today? We make a simple tower, maybe with 10 floors; however, we want variations for each floor. For example, save points appear only on every 3rd floor, every x floor is a simple puzzle to cool down, and a boss is waiting for you on the final stage (or somewhere in the middle?). And while you start slaying trash mobs, stronger enemies other than slimes cannot wait to fight against you. And no, we will not use a plugin to automatically increase monsters‘ levels, but we want variety!
Have you already noticed that you can use Switches as a precondition when you let objects such as chests or monsters spawn? Or, that you can use Variables to define how often objects will appear? Well, now you have!
Determine Player’s Progress
Maybe, you want certain events to appear as soon as the player reaches a certain floor. To do this, we create a new Variable „Progression“ like this:
RPG Maker MZ
RPG Maker MV


Pick „Room Y in Dungeon Layout“ and choose a fresh new Variable.
You get the current floor by using this script in a Variable Operation:
RandomMaps.getCurrentRoomY()Switches
Just before you (re)generate your dungeon, you can toggle Switches depending on any situation. Here’s a brief example:

You can check for everything!
Looking at the RPG Maker’s Variable Operations and Checks in the Conditional Branch, you now have great tools to extend your gameplay! Just a few ideas:
- Chests (don’t) spawn until a specific floor
- Other enemies appear as soon as your player reaches a specific level, party size, equipment, …
- Special Chests appear at every x-th level
Bind Switches to the Assets
- Go into the Plugin Manager and click on the RNGMaps Plugin of your choice
- When you see the list of Templates, you may want to duplicate one
- Inside a Template, you find a section where you define all the Assets
- Here, you can bind your Switch to your Asset like this:
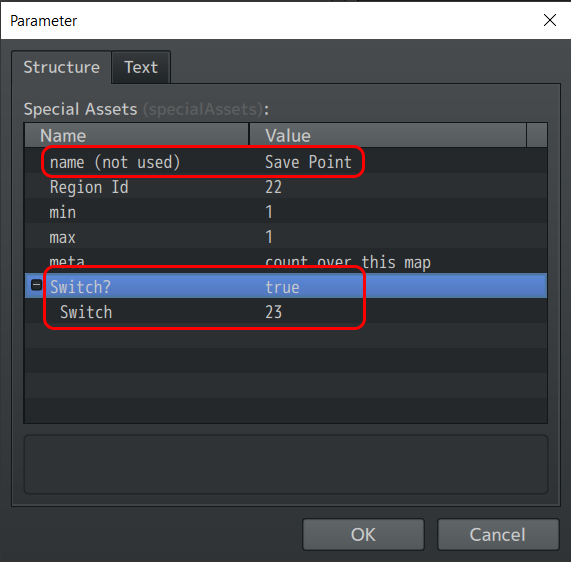
The Asset with Region ID 22 only appears when Switch #23 is ON.
Don’t forget to set all the other values, e.g., Region ID.