This article is out of date with version 3.0
This add-on sets up a virtual maze for you and helps you build a more giant dungeon that has exits in all directions. Such mazes will be a massive game-changer in your game but be aware they can raise your dungeon’s complexity a lot.
It’s not required for a Meta Maze to be complicated or to have forks; you can also make a linear road or a tower with 10 floors that the Player must solve. The plugin will memorize Self-Switches for you, which means when a player opens a chest, leaves the current floor, and revisit it later, the chest will remain in its state of being looted. The plugin also offers you some convenient functions, e.g., get the Player’s position inside the Maze to draw a Minimap.
A Meta Maze is a maze that requires some function calls to set up correctly. I recommend you to open the Sample Project in the Maker while reading this tutorial.
Step 1: Map Setup (only when using snippet-based Dungeon Generation)
You will need to update some maps first.
⇨ Exits via Assets Map
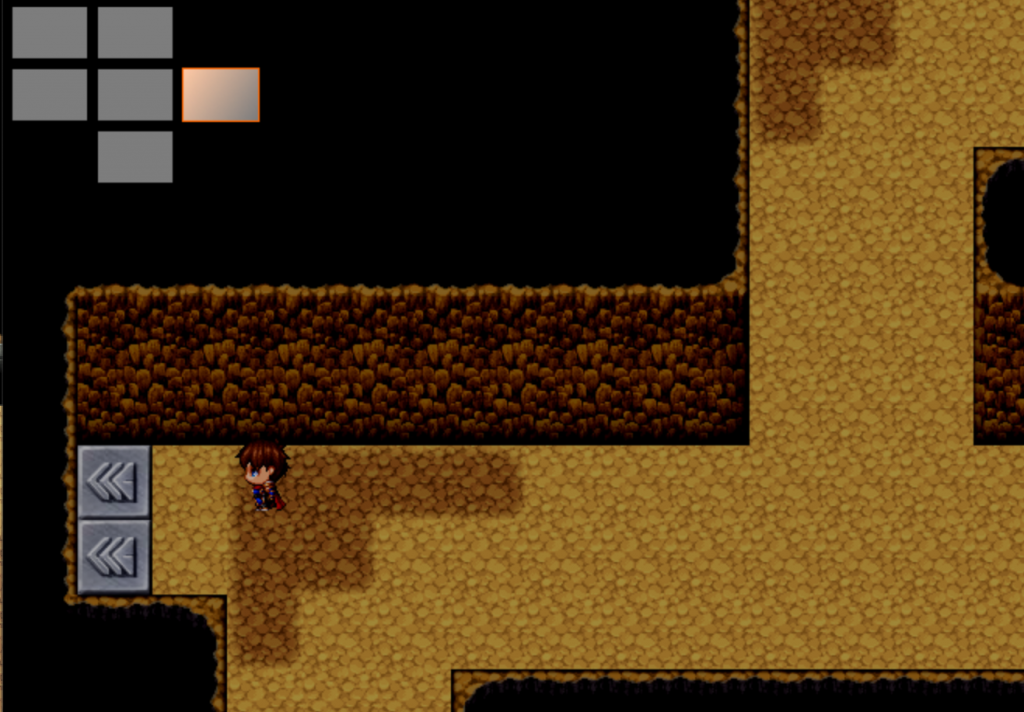
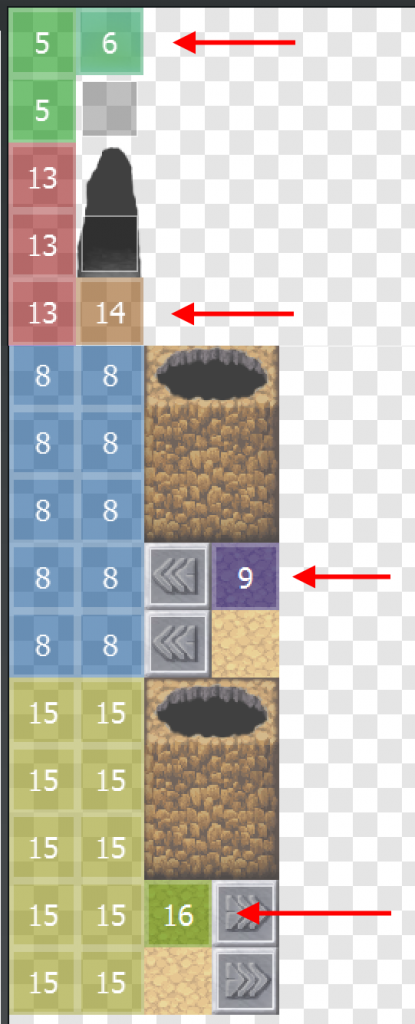
Just as we already made the Entrance and Exit before, we make 4 Exits while they require one Spawning Point each. Check the according Region Ids in the table below; you can change them in the Plugin Manager if you need to. Finally, we put some transfer events just as shown in the picture; we will fill their command lists later.
| Region Id | Spawn Point | |
|---|---|---|
| Top | 5 | 6 |
| Bottom | 13 | 14 |
| Left | 8 | 9 |
| Right | 15 | 16 |
If you want to use alternative exits that indicate if they lead to the following map or the final exit of this dungeon, go here.
⇨ Using Make Way out
Just as we already put spawning points on the Snippets, we need to put spawning points for all the other directions. Get the Spawning Point Ids from the table below; you can change them in the Plugin Manager if you need to.
| Spawn Point Id | |
|---|---|
| Top | 6 |
| Bottom | 14 |
| Left | 9 |
| Right | 16 |
Step 2: Create Meta Maze
Right before the Player enters the generated map, call this script once to create the Meta Maze:
$metaMaze.grid(width, height)
.withExit("top")
.withExit("bottom")
.apply()
.enterAt("bottom");
Go here to choose from all the available layouts.
Step 3: Update your existing JS codes (MV only)
Your JS command that generates your dungeon or map needs a small update. You don’t need the „withExit“ commands any more since the Meta Maze takes over this job for you. Furthermore, you must add a „spawnPlayerAutomatically“ command.
Example:
$dungeonGenerator.template("My Cave")
.spawnPlayerAutomatically()
.finalize()
This command only works when the Meta Maze is enabled.
Step 4: Go to the next Map
Go to your event(s) that transfer the Player to the following map. These are either exits on your Assets Map or the event with a „parallel process“ on your Space Map.
Use this line to let the Player move to the next map:
$metaMaze.goTo(direction)whereas direction must be one of these: „top“, „bottom“, „left“, or „right“.
Do a Conditional Branch –> Tab 4 –> „Script“ and insert
$metaMaze.isInsideMetaMaze()to check if the Player is still inside the Meta Maze. If so, call your event that generates the dungeon. Otherwise, you can transfer the Player to your desired location on your Worldmap or do anything else. It’s up to you!
This is an example of a complete Event Code:
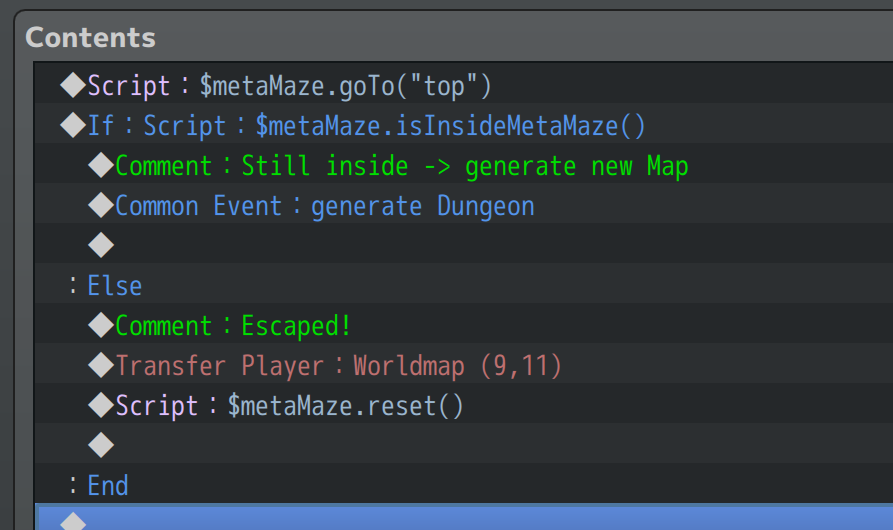
To reduce the chance of bugs, you should call this script when the Player leaves the dungeon:
$metaMaze.reset()