Random Maps v4 ready to try out: Read more
Table of Contents
Add Quest Log to the Main Menu
When the quest log doesn’t appear in your main menu, follow these steps.
In the Plugin Manager, open the settings for MK_UICustomizer. When „use custom menu commands?“ is enabled, open the „Menu Commands“ setting below.
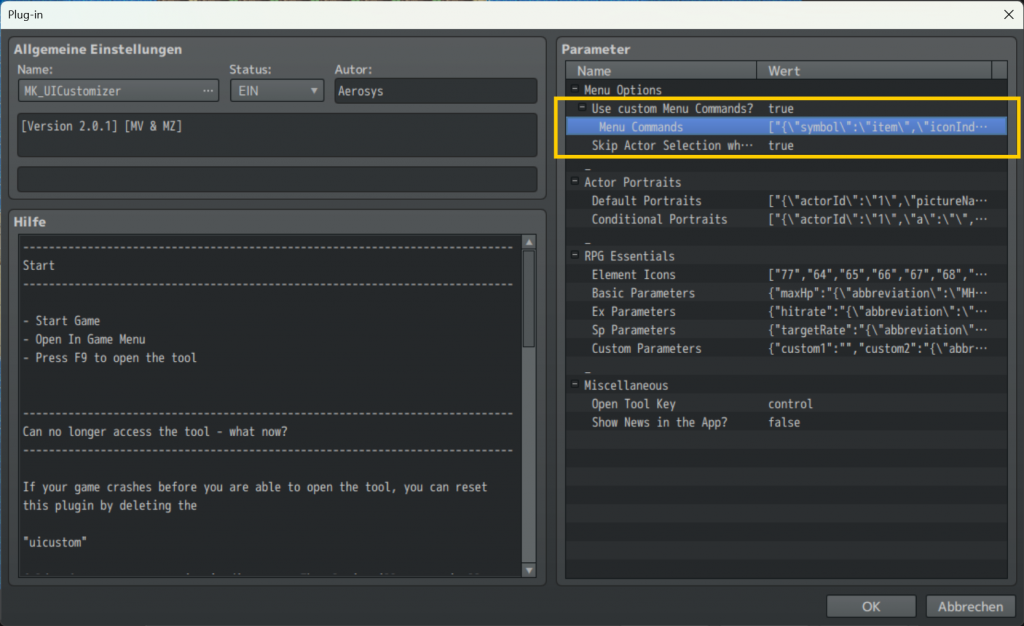
Create a new entry, and fill in the input fields like this:
| Symbol | quests |
| Icon | <as you prefer> |
| Text | <as you prefer> |
| Show when | – Plugin: MK_UICustomizer_Quests – other settings as you prefer |
| Enable when | <as you prefer> |
| Action | Jump to |
| Next Scene | Scene_Quest |
| Is personal? | false |
Design a Quest
The quest log adds contextual information to the player; however, it does not automatically track events, switches, or variables for you – only with a few exceptions. It relies on you, as the game dev, to add, complete, or fail quests via event commands.
Let’s start with the quest „The Beginning,“ which comes included with this plugin as a starter quest. In case you already deleted it, we also explain how to set it up again.
The quests are managed in the tool you open by default with F9, so we recommend keeping RPG Maker and the tool side by side on your screen.
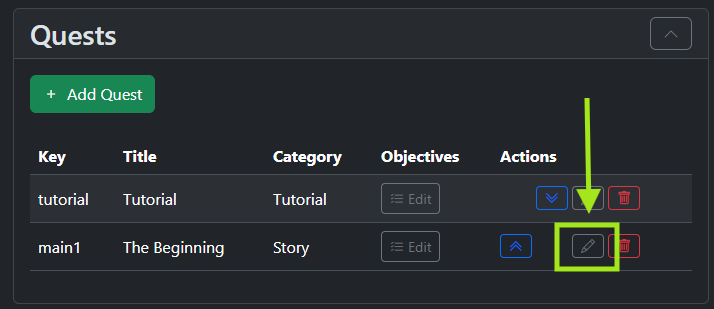
Now press F9 to open the quest tool, then open the „Quests“ tab. Click on the pencil icon next to „The Beginning“ or click on „Add Quest“ to create a completely new Quest.
Now, you see the main properties of a quest:
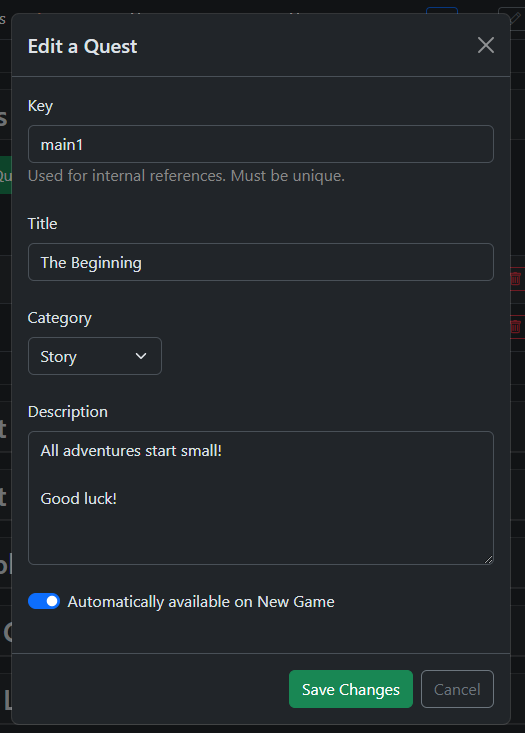
- Key: The key is what you, as the game dev, use to refer to the quest for event commands. It is usually shorter than the quest title. It is not visible to the players.
- Title: This is what your player will see in the game
- Category: You can categorize quests. This is for grouping and doesn’t have any other gameplay-related impact
- Description: What your player will see in the game
- Automatically available on New Game:
For our first quest, we want this to be visible immediately when the game starts so we don’t have to add it manually via eventing. Of course, you can choose otherwise.
Click on „Save Changes“ or „Cancel“ to close the dialog. Then click the „Edit“ button in the „Objectives“ column to inspect the objectives.
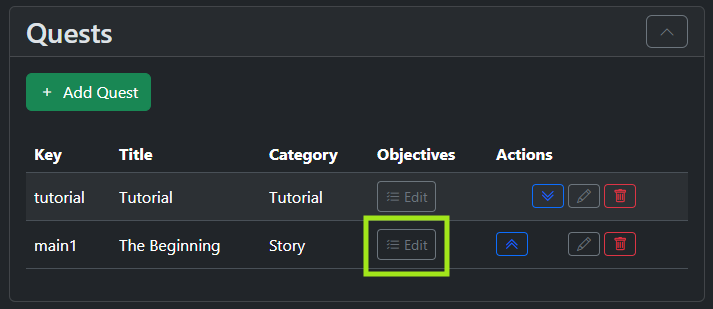
For this quest, we choose to add 3 objectives.
- Talk to the village elder
- Kill some monsters
- Return to the village elder and report
Objectives are usually uncovered and completed by the player one by one from top to bottom, but this is not a must. The plugin also allows you to show multiple objectives in parallel, or even make secret objectives that only appear when you, as the game dev, decide to.
Objective 1: Talk to the Village Elder
We want this objective to be of type „regular“ because the task only involves talking to an NPC.
We also want this objective to be available initially, as it is the first objective in this quest.
Change the description if you wish.
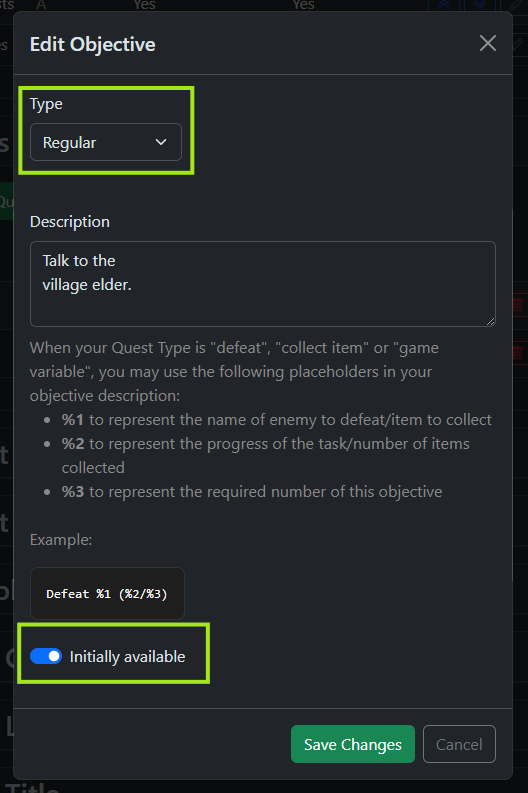
There’s nothing more to do here, so „save changes“.
Objective 2: A simple Kill-Quest
The next objective already includes additional logic.
Choose Type „Defeat„, pick an enemy from the list, and set an amount to make this objective a kill quest, and make this plugin automatically count enemy kills for you!
Kill-Quests start counting not before the objective is unlocked for the player!
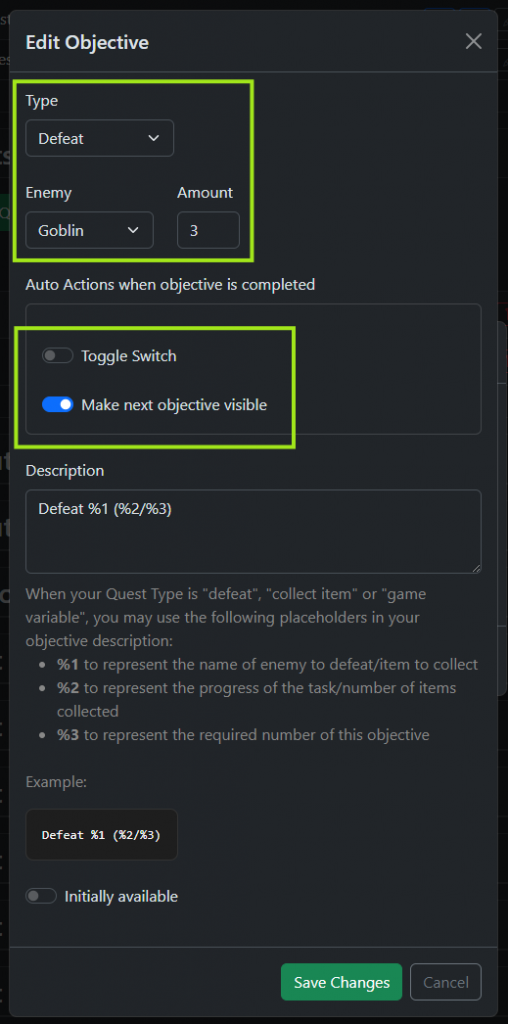
Kill-Quests offer 2 additional settings:
- Toggle Switch:
When enabled, this plugin will automatically switch on a Switch when the player fulfills this objective’s requirement. As this plugin doesn’t know about your project, this setting is switched off in the starter quest, but we recommend enabling it again! - Make next objective visible:
When enabled, the next objective will automatically become visible to the player as soon as its requirement is met.
The plugin will also switch off the Switch when a quest is no longer fulfilled; this can happen, e.g., in „collect item“ quests.
Kill-Quests offer 3 placeholders (%1, %2, %3) for the description box, explained in the toolbox below.
Objective 3: Return to the Village Elder
This is simply another objective of type „regular“.
Eventing in RPG Maker
Now, go back to RPG Maker. Our village elder will get 4 pages in total:
- When you talk to him the first time, and get ordered to go into the forest
- When you talk to him the second time, but the player hasn’t completed the kill quest yet
- When you talk to him after the player has completed the kill quest
- When you walk to him after the quest is completed.
MV users, please refer to the script calls explained below.
Page 1: Talk to the Village Elder
Add the following Plugin Commands:
- Complete objective 1
- Unlock objective 2 (the kill quest)
- Optional: Make the quest tracker show this quest
Furthermore, add some „show messages“, and finally, flip a Self-Switch or global Switch, as you prefer.
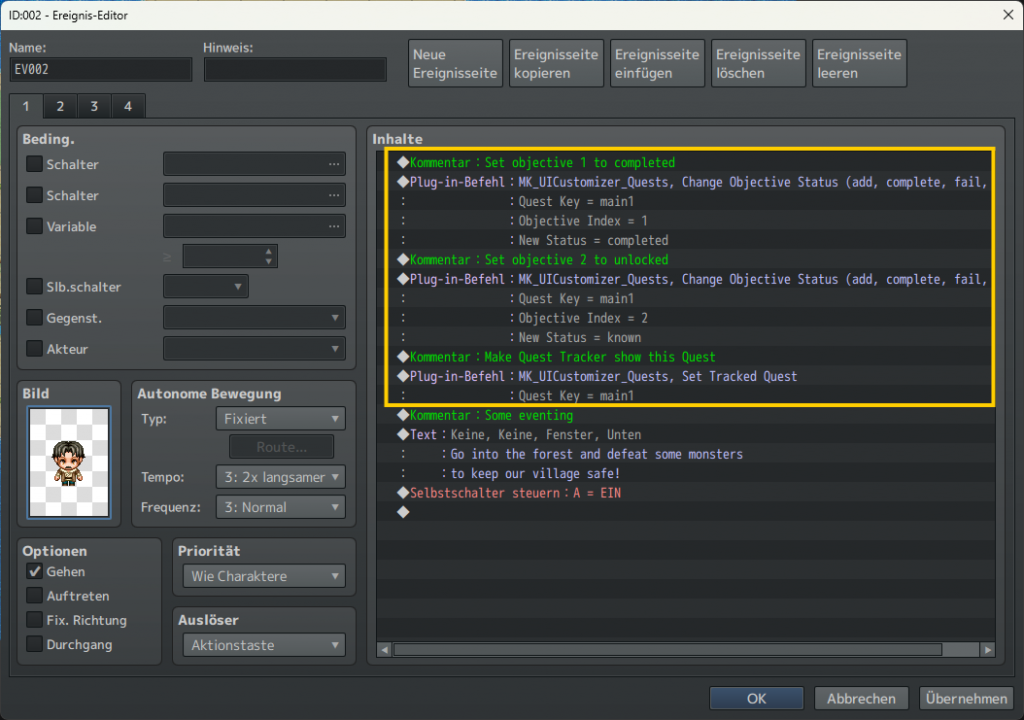
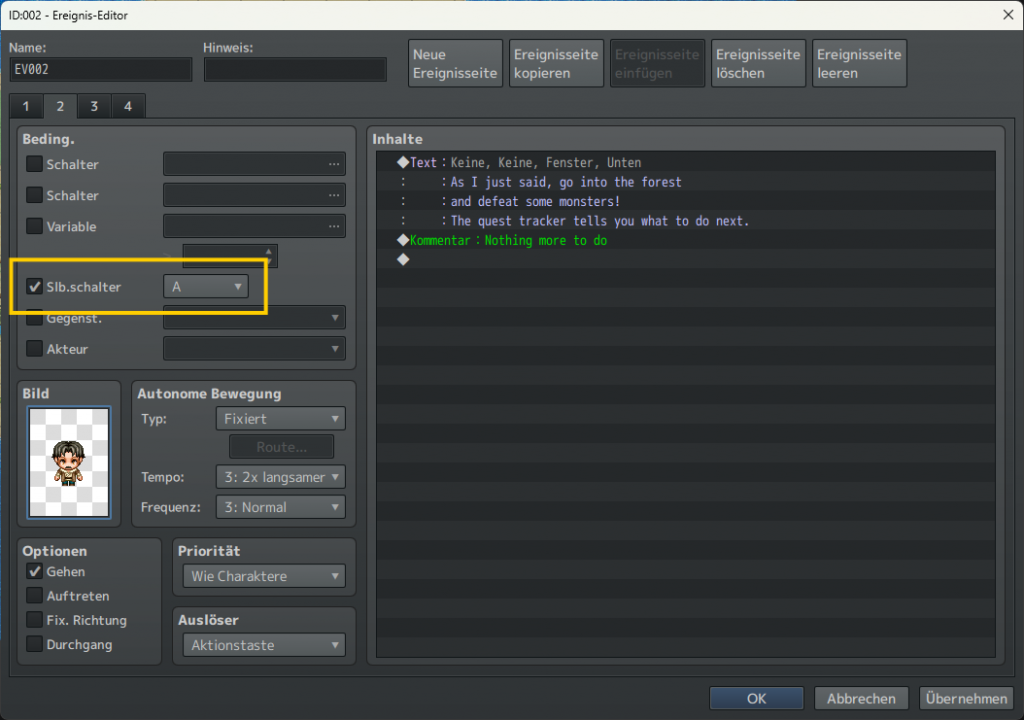
Page 2: Talk while not yet completed the Kill Quest
Add the Self-Switch or global Switch from the prior step as a requirement.
The event only contains some messages for the player. There’s nothing more to do here.
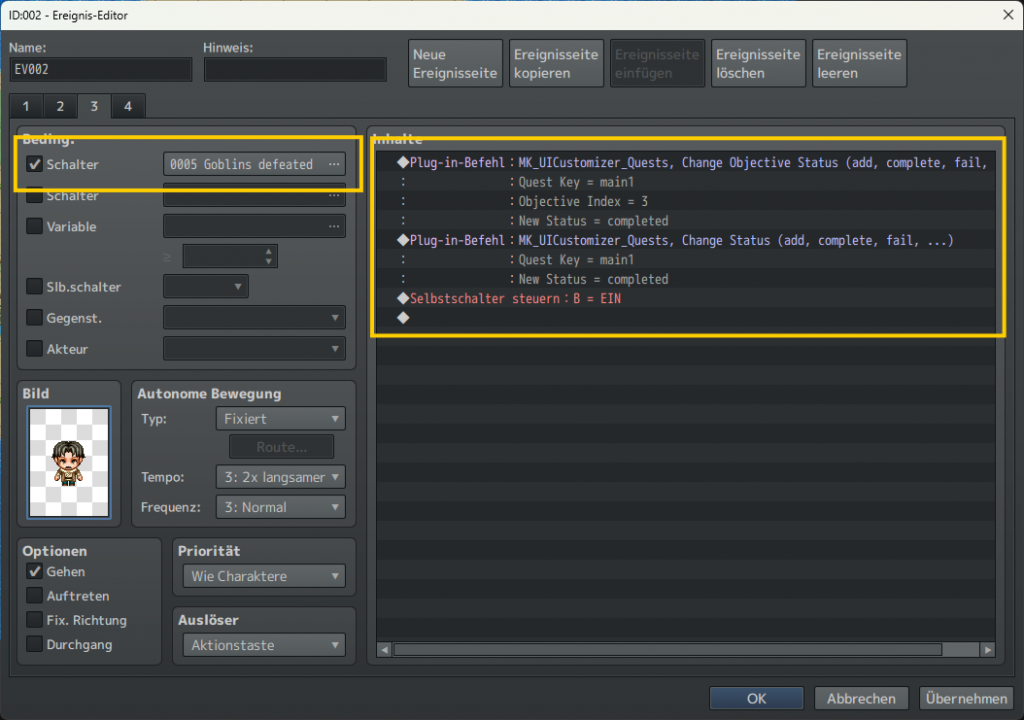
Page 3: Return to the Village Elder
Pick a new global Switch as a requirement.
Add the following Plugin Commands:
- Complete objective 3
- Complete the quest itself
- Optional: Give some rewards to the player
- Flip a Self-Switch or global Switch
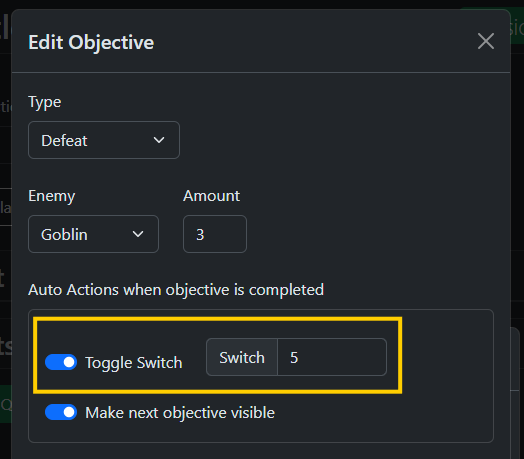
Don’t forget: In the quest log toolbox, open the kill objective and bind this Switch to the „Auto Actions“.
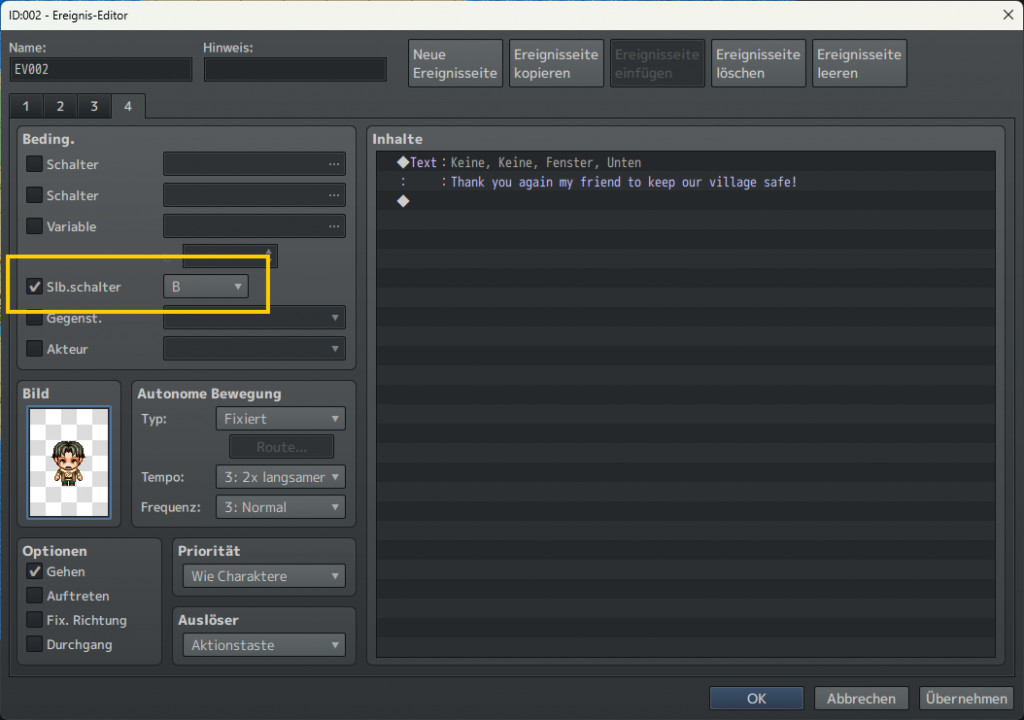
Page 4: Quest is completed
Add the Self-Switch or global Switch from the prior step as a requirement. There’s nothing more to do besides some messages for the player.
Show & Hide Quest Tracker
You have multiple options to control whether the quest tracker is displayed to the player or not.
When the player hides the quest tracker in the game’s options menu, it is not shown regardless of other settings.
MZ: Plugin Command
Simply use the plugin command to control the tracker’s visibility.
MV: Script Call
Use the script calls explained below.
Map-wide
Add this notetag to a Map to hide the quest tracker entirely. Useful for cutscenes.
<Hide Quest Tracker>Script Calls
MV users, please use the script calls explained below:
Control Quests
$gameSystem.setQuestKnown("chapter1")
$gameSystem.setQuestCompleted("chapter1")
$gameSystem.setQuestFailed("chapter1")
$gameSystem.removeQuest("chapter1")
Control Quest Objectives
$gameSystem.setQuestObjectiveKnown("chapter1", 1)
$gameSystem.setQuestObjectiveCompleted("chapter1", 1)
$gameSystem.setQuestObjectiveFailed("chapter1", 1)
$gameSystem.setQuestObjectiveUnknown("chapter1", 1)
Quest Tracker
$gameSystem.setTrackedQuest("chapter1")
$gameSystem.clearTrackedQuest()

Quests.showQuestTracker()
Quests.hideQuestTracker()
Quests.toggleQuestTracker()
Miscellaneous
- Open Quest Log:
SceneManager.push(Scene_Quest)